Fine Art image 1
Original Image

Produced Image

For this image I wanted to create an high key image and so I used 2 lights one was placed to the left and one directly facing with an umbrella to flood the image with light both of these were used with flash. I had the camera sat on a tripod. I would have like to have shot the image with a 50mm lens but I had just handed it back to university when I got the chance to shoot these images. So I used -
Camera - Canon 1000d
Shutter Speed - 1/15
Aperture - f/11
Focal Length - 48mm
Lens - 18-55mm
White Balance - Flash
Date - 06/04/2012
Location - My studio at home
Then I edited it in photoshop by turning the image black & white and added more brightness to attain the high key tone, contrast and fill black in order to make the darker area's more dominant then I adjusted the levels and curves to give the image more volume and to prevent it from looking flat. The overall finished image is what I was hoping to achieve and I was happy with the whole experience.
(Contact Sheet Below)
====================================
Fine Art image 2
Original Image

Produced Image

I had the idea to create a medial theme with these images and decided that I wanted to use location photography. This was a fantastic learning experience for me, and the lack of control with the lighting made it challenging for me to tackle. I used -
Camera - Canon 1000d
Shutter Speed - 1/25
Aperture - f/8
Focal Length - 39mm
Lens - 18-55mm
White Balance - Daylight
Date - 15/04/2012
Location - Rivington Pike
Weather - Extremely cold and slightly overcast
I then edited it in photoshop to achieve the effects I got. I started off with cloning some stuff out the pond on the left and a distracting mark to the right of the image. Then I added some brightness to enhance her detail on the dress, I turned the image black and white and added a tint to create a sepia effect in order to set the mood for the image I was trying to attain, then I added more contrast to enhance the reflections of the trees in the water as I didn't want that detail by blowing it out with the brightness that I added. I really enjoy this experience that much i am going to go back when the weather is warmer and see if I can produce better images than these.
(contact sheets below)
====================================
Fine Art image 3
Original Image

Produced Image

This is the same as above, I had the idea to create a medial theme with these images and decided that I wanted to use location photography in order to capture the old style surroundings. I used -
Camera - Canon 1000d
Shutter Speed - 1/25
Aperture - f/8
Focal Length - 22mm
Lens - 18-55mm
White Balance - Daylight
Date - 15/04/2012
Location - Rivington Pike
Weather - Extremely cold and slightly overcast
I then edited it in photoshop to achieve the effects, I adjusted the exposure slightly to enhance her facial features, I turned the image black and white and added a tint to create a sepia effect again in order to set the mood for the image, then I added more contrast to enhance the shadows and reflections and I added a little more colour with the curves. This really was a good learning point for me and I can certainly say I enjoy location photography more than I thought.
(Contact sheet below)
============================
Environmental image 4
Original Image

Produced Image

The environmental portraits were an easier part of the brief for me, I enjoy photographing people in their own environment as I feel it allows them to be more comfortable and relaxed when the camera is out. People's body language can say a lot in a photograph and capturing the natural side of a person can sometimes prove to be difficult.
Camera - Canon 1000d
Shutter Speed - 1/125
Aperture - f/5.6
Focal Length - 49mm
Lens - 18-55mm
White Balance - Daylight
Date - 20/03/2012
Location - Under Brooklyn Bridge, New York
Weather - Sunny spells
Aperture - f/5.6
Focal Length - 49mm
Lens - 18-55mm
White Balance - Daylight
Date - 20/03/2012
Location - Under Brooklyn Bridge, New York
Weather - Sunny spells
When I looked at this image on the computer I was highly disappointed with how dark and under exposed it was, I quickly realised that I should have adjusted the white balance to shade and ISO higher. When I saw the opportunity I instantly grabbed my camera and didn't have time to change settings, so I edited it in photoshop by adding more exposure and brightness to make him appear clearer, then I added some contrast to define the shadows, I adjusted the levels and curves to create a more colourful image and to add depth and tones.
(Contact sheets below)
(Contact sheets below)
================================
Environmental image 5
Original Image

Produced Image

This man was walking along the sea front when he started talking to me as we walked along toward the pier I discovered a little about him and I asked if I could take his photograph when we had walked to a point were I could include some detail into background rather than just having sand. He agreed as we had talked about why I was there so he was happy to assist. I found him very interesting to talk to and he responded well to me ordering him around to get the position right.
Camera - Canon 1000d
Shutter Speed - 1/125
Aperture - f/5.6
Focal Length - 24mm
Lens - 18-55mm
White Balance - Cloudy
Date - 21/03/2012
Location - Coney Island, New York
Weather - Overcast
Aperture - f/5.6
Focal Length - 24mm
Lens - 18-55mm
White Balance - Cloudy
Date - 21/03/2012
Location - Coney Island, New York
Weather - Overcast
I was more or less happy with the produced image although there was a slight muddy look to it with the weather being overcast, so I adjusted the levels to add some depth and adjusted the curves to create a warmer tone to the image. I added a little contrast and brightness to define the background a little more to finish the image off and to make it more presentable.
(Contact Sheets below)
=============================
Environmental image 6
Original Image

Produced Image

While walking through Battery Park in New York I noticed these men all sat doing the same things, the first thing I thought about was the visual irony of it. It was amazing how the two central men were both laughing at the same time while the outer two men were more serious looking. I knew I had to capture this image and I am glad I did as I really like it although I could have made it better by getting closer to show more of the men, but if I had done that I wouldn't have got them in their natural pose as I'm sure they would have seen me and clammed up.
Camera - Canon 1000d
Shutter Speed - 1/640
Aperture - f/5.6
Aperture - f/5.6
ISO - 100
Focal Length - 55mm
Lens - 18-55mm
White Balance - Cloudy
Date - 20/03/2012
Location - Battery Park, New York
Weather - Overcast
Focal Length - 55mm
Lens - 18-55mm
White Balance - Cloudy
Date - 20/03/2012
Location - Battery Park, New York
Weather - Overcast
I wasn't really happy with the produced image as it looked to have to much of a blue tone to it I wanted to create a natural day light look, so added a little brightness and contrast and adjusted the curves a bit to reduce the blue. The finished image looked to have more character to it and added a lot more depth, more of a tonal range and added texture to the background.
(Contact sheets below)
(Contact sheets below)
=================================
Candid image 7
Original Image

Produced Image

These ladies made my ideal candid portrait, While I was walking along the sea front I noticed a man peering through the holes in the fence so I reached for my camera to capture them but I wasn't quick enough as I only managed to photograph him moving away, then I turned around to see these ladies doing the same thing so I instantly took a photograph of them and managed to capture them before they moved seconds later.
Camera - Canon 1000d
Shutter Speed - 1/250
Aperture - f/5.6
Aperture - f/5.6
ISO - 100
Focal Length - 55mm
Lens - 18-55mm
White Balance - Cloudy
Date - 21/03/2012
Location - Coney Island, New York
Weather - Overcast
Focal Length - 55mm
Lens - 18-55mm
White Balance - Cloudy
Date - 21/03/2012
Location - Coney Island, New York
Weather - Overcast
I was really pleased with the photograph when I inspected it at home, so I just added a little more brightness to it in photoshop and adjusted the levels so it had a little more colour and texture to the fencing. The timing of this image was crucial in order to capture them and I was pleased with the crisp clear photograph that I produced.
(Contact sheets below)
===================================
Corporate image 8
Original Image

Produced Image

I took this image while experimenting with the lights, I wanted to create an image that showed his facial detail but not to much as to show blemishes and impurities and in order to achieve that I had 1 lights set up while using it on flash, I positioned it directly in front of him to highlight his face. After countless attempts I finally got the image I was happy with.
Camera - Canon 1000d
Shutter Speed - 1/15
Aperture - f/11
Aperture - f/11
ISO - 200
Focal Length - 55mm
Lens - 18-55mm
White Balance - Flash
Date - 06/04/2012
Location - My studio at home
Focal Length - 55mm
Lens - 18-55mm
White Balance - Flash
Date - 06/04/2012
Location - My studio at home
I was happy with the image and decided to just turn it black and white to add a mid tone effect. I had a problem with the shadow behind him so after trying to get rid of it, I realised I could tone it down by adding a light to his left side and directing it behind him, this did not occur to me till I was looking through them later. I have attempted to create it again and gained better results over the weekend with a range of lighting techniques.
(these images are below on a contact sheet)
(these images are below on a contact sheet)
Diane Arbus

Born: 1923
Died: 1971, at 48 years of age
Black and White square images
------------------------

Charles Atlas who was crowned "Worlds Most Perfectly Developed Man" Physical Culture Magazine at his Palm Beach Home.
------------------------------------------------------------------------

Girl in Her Circus Costume, 1970
---------------------------------------------------------------------------

Women carrying child in Central Park 1956
--------------------------------------------------------------------------------------

In terms of her subject matter, her portrait of this lady demonstrates her desired effect of shooting in the natural environments of her subjects.
-------------------------------------------------------------------

Mae West tried to sue Show Magazine over this portrait taken in her boudoir. Show published it in January 1965. Mae claimed she did not like they way she was tricked by Diane.
---------------------------------------------------------

Russian midget friends in a living room on 100th street N.Y.C 1963
-----------------------------------------------

Eddie Carmel
&
A Young Man in Curlers at Home on West 20th Street, N.Y.C. 1966
------------------------------------------

“Affinities” in Harper's she photographed sisters Lillian and Dorothy Gish. One can notice how she captures the connection between the two and yet still manages to uncover that eerie undertone for which she is mostly recognised.
--------------------------------------------------------
Diane's Approach
. Direct
. Never evaded facts
. Bold and undeterred
---------------------------------------------------------------
Diane's Visual Style of photography
. To show her subjects as they were, in their own natural and comfortable environment.
. Uneasiness.
. Harsh
------------------------------------------------------------------
Diane Arbus born on the 14th of March in New York, New York, U.S. Original name Diane Nemerov American photographer, best known for her compelling, often disturbing, portraits of people from the edges of society. At age 18 she married Allan Arbus, an employee at her family's store. Allan joined the Army at the beginning of World War II and was assigned to a photographic unit of the Signal Corps. After he left, Arbus discovered she was pregnant. Using a 5x7 view camera given to her by her father, she shot a series of photographs depicting her growing pregnancy, her first semi-serious entry into photography.

Diane Arbus Pregnancy Self Portrait
Before separating In 1959, they worked collaboratively, first taking photographs and creating advertisements for the store, then creating commercial fashion photography for Harper's Bazaar, Show, Esquire, Glamour, The New York Times, and Vogue. The photographic collaboration of Allan and Diane Arbus was uncommonly close and strangely co-dependent. Arbus would create the concepts for the fashion shoots and her husband, whose photographic training in the military made him a craftsman, would handle the technical aspects.
She later met Lisette Model, an Austrian-born documentary photographer, and studied with her. She was fascinated by Model's large images (16x20 was considered large at the time) of beggars and drunks and people whose lives were outside the norm. "When I point the camera at something," Model told her students, "I am asking a question, and the photograph is sometimes an answer." Arbus also began to study the work of earlier photographers to see what they photographed, how they photographed it, and why they photographed it. She studied Cartier Bresson and Weegee the tabloid photographer who she was particularly taken by with his work.
 Weegee
 Weegee
 Cartier Bresson
She became intrigued by the work of more documentary photographers—especially people like Robert Frank, who in the mid-1950s had recently completed his two-year Guggenheim-funded sojourn around the United States and was starting to show the ragged, savage photographs to his friends.

Robert Frank
She put aside the view camera and her medium format equipment and bought a 35mm Leica like that of Robert Frank. Arbus became smitten with grain, which of course was anathema to commercial photography. Her images were taken as she wanted them and she would move herself around continuously to get to the acquired position and then capture the image when the time was right, mostly being when the subject was not expecting it and so was in a natural relaxed position. She would never be afraid to delve into the world of the strange and the sordid, the outré and perverse, the wilfully weird, the crazy, the disabled, the very very different. Once quoted saying " "Freaks were born with their trauma. They've passed their test in life They're aristocrats."
Famous for her harsh “documentary eye” she had the unique ability to make the normal seem callous, She was driven by passion, by curiosity, by fear, by the thrill of facing down her fear, by loneliness, by a need to fill an emotional emptiness, by creative energy. 'freaks.' This was clearly a deliberate choice on her part. She did it primarily by exaggerating some aspect of the subject. "You see someone on the street," she said, "and essentially what you notice about them is the flaw." She often photographed people at an uncomfortably close range. She spoke about a sense of unreality to her life, and it seems to me she attempted to inject reality into it by compulsively seeking out new and radically strange experiences. An article in Time, by Robert Hughes described Arbus as saying “What I’m trying to describe, is that it’s impossible to get out of your skin into somebody else’s. And that’s what all this is a little bit about. That somebody else’s tragedy is not your own.” This quotation perfectly describes the unique yet hard to place quality found even in her earliest of work.
Website - http://diane-arbus-photography.com/
Documentary part 1 - http://www.youtube.com/watch?v=wKXwCctBLQU
Documentary part 2 - http://www.youtube.com/watch?v=xTR2nuxy_8M
Documentary part 3 - http://www.youtube.com/watch?v=U7VlCNIxB-A&feature=related
Documentary part 4 - http://www.youtube.com/watch?v=mC12FgLLYqU
---------------------------------------------------------------
Aspects to consider with Photography
----------------------------------------------------------------
Aspects to consider with Photography
Metering - The two main meter readings are reflective and incident, for a reflective reading you open
the invercone and face the meter towards the subject in order to capture the amount of light falling on the subject. An incident reading is where you would leave the invercone closed and would take the reading by facing the meter to the camera or the lights. The camera's light meter can only measure reflective light from a subject that appears as middle grey 18%. Spot metering - This is when the meter only reads from a small area which is a great advantage if your unsure of the subjects reflectance and you also have to have a grey card for this metering.
Light Source - The visible spectrum of light consists of a range of wave lengths from 400nm to 700nm (nanometres)below 400nm is uv light and xrays and above 700nm is infared. White light is the main spectrum, which is made up of blue, green and red colors.
Color temperature is measured in kelvins so light from a tungsten/halogen is (3200k)
Photoflood (3400k) = REDS
AC Discharge (5600k)
Studio Flash (5800k) = BLUES
----------------------------------------------------------------
Enviromental Portrait


-----------------------------------------------------------------------------------------------------
People Portraits Contact Card


After a short time in the studio attempting to get a good corporate portrait of my fellow students my results are above on the contact sheets and below are the finished results after I changed some details in the photo shop program.
Image 1
The studio was dark and I used a flash light with beauty dish to the front right of my subject and a continuous light with a snoob attached to the back left side, and also had a black background. I then had to create a stylised, high contrast black and white image which I achieved by using the photo shop program to create my finished result. Using a light meter to correctly expose the image and a 50mm lens, I had the camera set to ISO-200, Shutter Speed-1/60, Aperture-f/11. White balance was set to flash.

Image 2
With this image I had the flash light with beauty dish attached to the front right of my subject. The studio was dark and it was a black background that I used. I then applied the black and white and high contrast tool within photo shop program. Using a light meter to achieve the correctly exposed image I had my camera set to ISO-200, Shutter Speed-1/200, aperture f/11 and white balance set to flash. Using a 50mm lens.

Image 3
This image was achieved with a 50mm lens the use of a flash light with a beauty dish attached this was placed to the front right of my subject. The studio was dark with a black background and I used photo shop program to create the finished image. I used a light meter to correctly expose the image with the camera set to ISO-200, Shutter Speed-1/200, Aperture-f/11 and White Balance set to flash.

Image 4
I achieved this image by using a flash light with beauty dish to the front right of my subject and a continuous light with a snoob attached to the back left. The background was black and the studio was dark. I then used photo shop program to create the finished effect. I used a light meter to ensure correct exposure with a 50mm lens. ISO-200, Shutter Speed-1/100, Aperture-f/11 with White Balance set to flash.

--------------------------------------------------------------------------------------------------------------
Accrington Pipe Band
After seeing the band play in Darwen last year, really enjoyed the atmosphere
they created around the town. So after contacting them I arranged to go and photograph them in all their uniforms while playing in public, then I went over to where they practised and got a few photographs of them all practising. I spoke to a lot of them on a one to one basis which was great experience for me to meet new people. They all had a story to tell and I found this in their faces when photographing them in practise.


--------------------------------------------------------------------------------------------------------------------
Portraits
This part of the brief was a difficult part for me, I could not decide on how to do this but after some research into it I found a great deal of help and advice on the Internet and within a few books which I purchased, these are listed on my references page.
So a few of us decided to go in the studio and have a practise with the lights and available resources and produced a set of images that I thought were quite striking.
So with the use of 3 lights which we had 2 positioned behind the model to the left and right and we had screen to defuse the lights so that the lights were defused and not hard. Then we had the other light to the front left and with the use of a piece of board with a hole through it we were able to create a nice glow on the face. The light to the left back highlighted her hair, while the light to the right back created a nice silhouette around her face and the front light gave a subtle glow to the left side of her face, highlighting her facial features. Below is a photo of the set up and the images I took.

These images were taken using camera settings
f/16
1/200
ISO 200
Between focal lengths 50 & 55mm
All taken with a 55mm lens


--------------------------------------------------------------------------------------
Corporate Portraits
In order for me to get my corporate portrait I tried a great number of lighting techniques and after a number of tries I managed to capture a photo that I was happy with. Although the first few images I had a bold shadow which I didn't like at all so I moved the lights around a number of times until i got rid of the bold shadow.
 f/11, 1/125, ISO 200, focal length 38mm

f/16, 1/125, ISO 200, focal length 37mm
 f/16, 1/125, ISO 200, focal length 33mm
 f/16, 1/125, ISO 200, focal length 45mm
 f/16, 1/125, ISO 200, focal length 34mm
 f/16, 1/125, ISO 200, focal length 41mm

f16, 1/125, ISO 200, focal length 55mm
After a number of shots I decided to try a black background as I preferred the black one and it stopped the image from looking like a passport photo. The shadow to the back was still visible and I tried a number of ways to abolish it but without success. Then when i was looking at the images the following day I realised that the shadow problem could have been sorted with the use of another light to the back left, really that simple but yet at the time I didn't even consider that thought. So the images themselves towards the end of the shoot were looking good, with the use of my light meter I managed to get a good exposure and felt the lighting did him justice.
Corporate Portraits
In order for me to get my corporate portrait I tried a great number of lighting techniques and after a number of tries I managed to capture a photo that I was happy with. Although the first few images I had a bold shadow which I didn't like at all so I moved the lights around a number of times until i got rid of the bold shadow.
 f/11, 1/125, ISO 200, focal length 38mm
f/16, 1/125, ISO 200, focal length 37mm


f/16, 1/125, ISO 200, focal length 37mm
f/16, 1/124, ISO 200 focal length 37mm


f/16, 1/125, ISO 200, focal length 45mm


f/16, 1/125. ISO 200, focal length 46mm


f/16, 1/125, ISO 200, focal length 49mm


f16, 1/125, ISO 200, focal length 55mm
After a number of shots I decided to try a black background as I preferred the black one and it stopped the image from looking like a passport photo. The shadow to the back was still visible and I tried a number of ways to abolish it but without success. Then when i was looking at the images the following day I realised that the shadow problem could have been sorted with the use of another light to the back left, really that simple but yet at the time I didn't even consider that thought. So the images themselves towards the end of the shoot were looking good, with the use of my light meter I managed to get a good exposure and felt the lighting did him justice.
----------------------------------------------------------------------------------------------
Contact Cards for Corporate Portrait and Fine Art Portrait


----------------------------------------------------------------------------------------------------------------------
Fine Art Portrait
Wow this was really enjoyable to do I had a good old play with the lights and slight movements with the model. The lighting was nice and a couple were over exposed although my intentions were to create high key images from these. I had

1/15
ISO 100
focal length 34mm
with a 55mm lens

1/15
ISO 100
focal length 38mm
with a 55mm lens

1/15
ISO 100
focal length 40mm
with a 55mm lens

1/15
ISO 100
focal length 55mm
with a 55mm lens

1/15
ISO 100
focal length 55mm
with a 55mm lens

1/15
ISO 100
focal length 47mm
with a 55mm lens

1/15
ISO 100
focal length 41mm
with a 55mm lens

1/15
ISO 100
focal length 41mm
with a 55mm lens

1/15
ISO 100
focal length 43mm
with a 55mm lens

1/15
ISO 100
focal length 49mm
with a 55mm lens

1/15
ISO 100
focal length 41mm
with a 55mm lens

1/15
ISO 100
focal length 48mm
with a 55mm lens

1/15
ISO 100
focal length 55mm
with a 55mm lens

1/15
ISO 100
focal length 44mm
with a 55mm lens
 f/11
f/11
1/15
ISO 100
focal length 38mm
with a 55mm lens
--------------------------------------------------------
Lighting
Ambient lighting is used to set the mood when taking a photograph, painting a picture, shooting a movie or even in the home The use and placement of ambient light sources create the ambiance, or mood. Certain features of objects or areas can be highlighted or hidden by strategic placement of different types of lighting. Natural light is comprised of sunlight or skylight, This will produce distinct shadows, sharp delineation and enhances subject textures if it comes from one side stretching across the surface. This can emphasise the perception of depth in the scene. Direct sunlight often forces people to squint while the photographer places the sun behind their back. Without the use of corrective filtration, subject colors can shift towards warm/yellow hues quite noticeably when under direct sun in the early morning or late evening. Skylight on the other hand, produces softer shadows and less delineation or texture enhancement. A slight color shift towards cooler blue's may be noticed since the sky color is closer to the balance of color film or digital sensors than the color temperature of direct sun. So when a person stands outdoors in the shade of a tree, the area around their eyes often turns out very dark in the photograph. This is because the effect of skylight is pleasing and easy to observe, but the amateur photographer doesn't notice the dark eye sockets produced by the large the sky. This is why you will see any wedding photographer worth his salt balancing the ambient natural light with frontal electronic flash. If no flash is available, positioning the subject under the tree canopy will help.
Continuous lighting is easier in respect of seeing what the photograph will look like with the applied lighting as it allows you to see the quality of light falling on your subject before you take the shot. But the problems with many continuous light systems is that you can’t easily make adjustments to power levels the way you can with strobes, and if you’re using Tungsten lamps, you can’t shoot in mixed lighting situations where there is daylight without experiencing color imbalance.
Portrait photography usually requires soft lighting, with the main light that is on the subject being known as the key light. The direction of the light controls the shadows and the size of the light controls the appearance of the shadows and highlights. Soft boxes spread the light evenly, and removes the appearance of blemishes and spots on the subject, With a spot light it would show all the facial features including spots, and wrinkles. By having the lighting close to the subject it illuminates unevenly although it may achieve better subject and background separation as the subject becomes much brighter. One of the key points to portrait photography is known as the key triangle which is where there is a triangle of light below the subjects eye next to the nose. If the triangle is to big the light is to close, if the triangle is narrow the lights are to far to the side which can make the nose appear bigger. If the triangle is short the lights is to high or to low which results to the eyes being shadowed.
The main light on the subject is the key light.
The direction of the light controls shadows
The apparent size of the light controls the appearance of shadows and highlights.
Hard Light Soft Light
Light Size Small Large
Shadows/Highlights Abrupt Gradual
Types of Sunlight Direct Overcast/shadows
Types of Flash Direct Bounced/defused
Low Key Lighting - Low-key lighting throws areas into shadow, accentuating contours
The idea behind low key lighting is simple: dark tones, minimal lighting, and emphasis on certain areas of the subject. This is the perfect lighting setup for those with just one light, because single light portraits look great in this lighting scheme, you are best with a dark background, your subject in some dark clothing as this will help put emphasis on your subject’s face. When you set up your key light, keep it off to the side of the subject. When setting up it is advisable to go for a 45 degree setup then fine tune from there to fit your tastes and the subjects facial features. Keeping your key light off to one side will keep the light on the subject without lighting up the background too much. To help darken it even more, just rotate it further away until the subject is just on the edge of the light. If you find that the shadow side of the subject is just too dark, try filling it in with another light or a reflector.
The idea behind low key lighting is simple: dark tones, minimal lighting, and emphasis on certain areas of the subject. This is the perfect lighting setup for those with just one light, because single light portraits look great in this lighting scheme, you are best with a dark background, your subject in some dark clothing as this will help put emphasis on your subject’s face. When you set up your key light, keep it off to the side of the subject. When setting up it is advisable to go for a 45 degree setup then fine tune from there to fit your tastes and the subjects facial features. Keeping your key light off to one side will keep the light on the subject without lighting up the background too much. To help darken it even more, just rotate it further away until the subject is just on the edge of the light. If you find that the shadow side of the subject is just too dark, try filling it in with another light or a reflector.
Mid Key Lighting -
Is simply lighting that makes the overall tones in the photograph somewhere in the middle, so they are not too dark and not too bright.To make your subject stand out, you’ll want them to be the brighter part of the image. Like low key lighting, this style of lighting works nicely with one light portraits although more lights or reflectors could be used. You can position your subject and key light in such a way that the light hits both the subject and spills on to the background. With your subject close to the light, she will automatically be brighter than the background and by putting a white background far enough away from the light, you’ll get a Gray background or by applying enough background light onto a black background and you’ll also get a Gray background and still attain a mid key lit image.
High Key Lighting - High-key lighting eliminates shadows by using multiple sources of lighting.
High key image lends itself to a bright and cheery feel which seems to be of high demand on the current market today this could be the fact that it evokes happy emotions. There are a couple of approaches to high key lighting that could be used the first is to use multiple lights as this benefits you by giving you total control. Simply position your model a bit from the background and set up your lighting with just enough light so the model looks good. Once you like the setup, position a light or two behind the model and out of the frame, pointing at the background. Umbrellas work well here to reflect the light all over. Set the power of these lights higher than the lighting on the model.
The second is to use one light, which gives you a little less control, but will still works to produce a high key image and is especially useful if you’re short on lighting. Simply set up a single light several feet from your model off to the side, without using any light modifiers. Make sure the light hits both the subject and the background. Now place a diffuser panel between the light and the model. This will soften the light and also knock down the power, effectively making the background brighter than the model, you could fill in the shadow side of the model with a reflector. The big problem with one light is lack of control and lack of flexibility. This is best for high key head shots. As the light falls off so quickly, a white backdrop would benefit you more but you need to remember you’ve got to keep the model and light pretty close to the background, or it will end up Gray.
-----------------------------------------------------------------------------------------------------------------------
When I started researching lenses I really didn't realise how many there were available on the market. So I decided to make a start with experimenting with as many as possible, I have been hiring them off Kevin and have purchase a couple myself. Here are the results of the lenses I have experimented with so far and this will be an ongoing project in order to get a better idea of what lenses can and cant do. Also in these images are some lighting experiments I tried out.


-----------------------------------------------------------------------------------------------------------------------
Lens Research
What is an EF-S lens?
1987
Canon standardised on a single lens mount system for all of their SLR cameras - the EF (electrofocus) lens mount. So throughout this time there was no possible source of confusion, since all EF lenses made by Canon and other lens makers will physically fit all Canon EOS cameras.
2003
Canon introduced a new digital camera, the consumer-oriented EOS 300D/Digital Rebel/Kiss Digital camera, which sported a new lens mount design dubbed EF-S. All consumer to mid range digital EOS cameras released since have been both EF and EF-S compatible. So it’s important to remember that digital camera bodies with EF-S lens mounts are totally compatible with all regular EF lenses. However an EF-S lens can fit only EF-S compatible cameras and no others. .
EF-S bodies have small mirror boxes - roughly 2/3 the size of a regular EOS camera (also known as a 1.6x cropping factor which I will describe later) - because they use image sensors which are smaller in area than a frame of 35mm film. They are thus often called sub frame cameras. Cameras which use 35mm film, or which contain digital sensors the same size as a frame of 35mm film, are commonly called full frame cameras these days.
EF-S cameras support lenses with a shorter back focus distance than EF lenses, because the mirror swings further back. This is where the “S” comes from - EF-S lenses have shorter back focus distances. (ie: the back part of the lens can get physically closer to the image sensor since the mirror is smaller) Having a shorter back focus distance allows Canon to produce cheaper wide-angle lenses that work with the smaller image format of a sub frame digital SLR, since it’s optically very challenging to create a wide angle lens with a long back focus distance.
Canon have a range of EF-S lenses available, ranging from inexpensive kit lenses to very good high-quality lenses with image stabilisation. There’s even a 60mm macro lens with an EF-S mount. The super wide angle EF-S 10-22mm 3.5-4.5 USM (roughly 16-35mm coverage if it were full frame) is particularly well regarded, as is the EF-S 17-55 2.8 IS USM, which is an L lens in all but build quality and name.
The main issue to be concerned about with EF-S is the future value of the lenses. Right now full-frame image sensors are extremely expensive to make, which is why nearly all digital SLRs out there have image sensors smaller than that of a frame of 35mm film. But in the future it’s likely that prices on such sensors will drop, at which time full-frame digital SLRs will become more affordable and thus EF-S lenses will no longer be of use except on pre-existing cameras.
Lenses are very complex things and choosing the right one can result in fantastic images.
Most cameras contain lenses which are actually comprised of several "lens elements." Each of these elements directs the path of light rays to recreate the image as accurately as possible on the digital sensor. Optical aberrations occur when points in the image do not translate back onto single points after passing through the lens which causes image blurring, reduced contrast or misalignment of colors (chromatic aberration). Lenses may also suffer from uneven, radially decreasing image brightness (vignetting) or distortion.

The focal length of a lens determines its angle of view, and also how much the subject will be magnified for a given photographic position.
Wide Angle Lenses
Wide angle lenses come both as prime lenses but also are being found at the lower end of telephoto zoom lenses increasingly wide angle lenses have short focal lengths but have the advantage of capturing a wide image, and it exaggerates or stretches perspective. They are useful for landscapes and for getting in nice and close to subjects still fitting a lot of them in. Wide angle lenses come both as prime lenses but also are being found at the lower end of telephoto zoom lenses increasingly. Very wide lenses will sometimes distort your image a little or a lot, especially at the edges of your photos where they can be quite curved. This can be used to great effect but can also be quite frustrating at times.
Some tips to achieve better photographs when using wide angle lenses
1) Watch those horizons and the vertical lines of buildings so they don’t look skewed in your photos. Keep the camera level as much as possible.
2) Wide-angle lenses exaggerate the relative size of objects close to the camera, you can end up with weird proportions in your photos
3) Wide-angle lenses may add purple or cyan glows around back lit subjects.
4) Camera add-ons may actually intrude into the picture area with wide-angle lenses
5) Your digital SLR’s built-in electronic flash might not spread wide enough to cover the full frame of a wide-angle lens. Use a diffuser or wide-angle adaptor over your flash.
Telephoto Lenses
Telephoto lenses have longer corresponding focal lengths, the benefit of zooms are that you do not need to physically get closer to your subject to get a tighter framing of the image, although it can also compress or flattens perspective. These lenses are the most popular DSLR lenses at present and come in a range of configurations and levels of quality. These lenses can have quite narrow ranges or quite long ones. The longer your focal length the more impact that camera shake has on your images, but most lenses these days have the benefit of Image Stabilisation (IS) to combat the camera shake aspect.
Some tips to achieve better photographs when using a telephoto lenses
1) The electronic flash built into most digital cameras can’t reach more than 10 to 20 feet, so if your subject is farther than that, you end up with a very underexposed photo
2) Longer lenses magnify the shakiness of lightweight cameras, use a shutter speed that’s high enough to counter the vibration.
3) Telephotos have less depth-of-field at a given aperture. If you need the maximum amount of depth of field, use a small f-stop.
4) The air can be full of enough haze or fog to reduce the contrast of your long telephoto shots and affect your pictures.
5) Telephoto lenses have a narrow field of view, making it easy for bright light outside your image area to affect your image with flare, which reduces contrast.
Macro Lenses
These lenses are specifically designed for shooting small objects up close. Many lenses and cameras come with a ‘macro’ setting but true macro lenses will produce images that are life size and that enable you to get in incredibly close to the subject you're trying to capture.
Prime Lenses
A prime lens is a lens that has one focal length only. They are becoming less popular in an age where photographers like to have the convenience of a range of focal lengths at their finger tips, but prime lenses are known for their image quality and speed (faster aperture).
Fisheye LensesUse this to take hemisphere-shaped photos, it is a lens with an extreme wide angle. Although it may be difficult to use a fisheye when you are not using a full frame DSLR. If you are interested in doing this, you can get the Canon F2.8 fisheye which is 15mm. For the lower end of the market and depending on your budget, you can get the 8mm Peleng fisheye, although the main concern with the Peleng fisheye is that they can only focus manually. You can also buy screw-on fisheye lens adaptor which screw-on, these fisheye lenses produce images that are way too soft.
Lens Hoods
The primary reason for using a lens hood would be to prevent light from hitting the front lens which causes flare. Flare on the lens from bright things like the sun will reduce the pictures contrast and seriously reduce the images quality. Super bad flare can even make the subject impossible to shoot. However, some pictures taken while using the proper lens hood on your lens can basically save the image and offer the photographer a deeper saturation and richer colors.
On top of the main lens hood purpose which is stopping the glare from hitting the front of your lens, lens hoods are also protecting the Lens with extra layers of protection. Lens hoods come in many different sizes and you will need to find the correct hood for the lenses you are using. A 37mm lens hood and a 57mm lens hood are not the same. The extra protection a lens hood offers range from a broken front element or a broken protective filter all the way down to a scratch on the main lens or UV lens or simple finger print smudges.
The difference between a zoom lens and a fixed focal length (prime) lens?
A prime lens is a lens in which the field of view (focal length) cannot be adjusted. The only way to take in more or less of the scene is to walk closer to or further from the subject.
A zoom lens is a lens in which the field of view can be adjusted. If you can’t fit in all your friends in the picture, for example, you could just rotate the zoom ring on the lens until they’re all in there. Or if that bird is too far away you could rotate it the other way to zoom in closer.
Up until the late 1980s prime lenses were the most common lens sold, because from an optical design standpoint it’s much easier to design a high quality prime lens that can take nice sharp photographs than a decent quality zoom lens. But a prime is also obviously a lot less convenient, since you have to move around more to fit stuff in. So by the late 80s zoom lenses became more and more popular. Today hardly any low-cost lenses are prime lenses, because everybody wants zooms.
Prime lenses are easier to build and offer fewer compromises in design, if you want a really sharp crisp lens, then a good prime will offer sharper pictures than most zooms. Or if you want a lens that can let in lots of light and thus can be used for low-light photography then you’ll probably want a prime, since it’s much harder to build a “fast” zoom lens.
An ideal lens - small, lightweight, has zoom capabilities, lets in lots of light, is really sharp, has high contrast, doesn’t distort the image and is cheap, but you can only get some of those properties it’s impossible to get all of them.
If you change your lenses a lot, make sure that you regularly prevent dust from accumulating on your sensor.
1.Always remember to point your camera down when changing the lens. It’s best that the sensor should face the ground so that there are no dirt particles that land on your sensor.
2.Clean your sensor regularly.
Description Of The Numbers On A Lens
CANON LENS EF 28-80mm 1:3.5-5.6. Ø58mm.
28-80mm refers to the focal length of the lens. In this case there are two values since the lens is a zoom lens which can go from 28mm at its widest to 80mm at its longest. These numeric values in millimetres essentially indicate the coverage area of the lens.
1:3.5-5.6 refers to the widest aperture of which the lens is capable. The 1: is there since f/stops are, technically speaking, ratios. Since the lens is a zoom there are two aperture values - f/3.5 and f/5.6. This particular lens is an inexpensive amateur lens which can be opened up to f/3.5 at the widest end (28mm) but only f/5.6 at the longest end (80mm). This means it’s a fairly slow lens - it can’t let in much light, even when its aperture diaphragm is fully open.
Note that the auto focus motor type is not indicated, which means that the lens uses either an AFD (arc-form drive) or micromotor drive. Both types are slow and noisy compared to ultrasonic (USM) motors.
Ø58mm refers to the filter ring diameter. In other words, screw-on filters 58mm in diameter will fit this lens.

Cheapest
These inexpensive lenses feature all-plastic barrel construction with plastic lens mounts (the 75-300 series and the 28-200 lenses being exceptions - they have metal mounts) and no distance scales. Those lenses in this category which have ultrasonic motors (USM) use cheaper micromotor USM, not ring USM. USM lenses are marked with a striped gold line around the end. Some of these lenses also have silver (chrome) rings around the end for good looks. Most lenses in this category support optional manual focusing, but their manual focus rings are usually awkward and cumbersome to use.
EF-S 18-55 3.5-5.6, Ø58
Inexpensive EF-S kit lens; reasonable optical quality
EF-S 18-55 3.5-5.6 USM, Ø58
Apparently only sold in Japan
EF-S 18-55 3.5-5.6 II, Ø58
Cosmetic update to the above
22-55mm 4.0-5.6 USM, Ø58
28-105mm 4.0-5.6, Ø58
28-105mm 4.0-5.6 USM, Ø58
28-80mm 3.5-5.6, Ø58
28-200mm 3.5-5.6, Ø72
28-200mm 3.5-5.6 USM, Ø72
28-80mm 3.5-5.6, Ø58
28-80mm 3.5-5.6 II, Ø58
28-80mm 3.5-5.6 II USM, Ø58
28-80mm 3.5-5.6 III, Ø58
28-80mm 3.5-5.6 III USM, Ø58
28-80mm 3.5-5.6 IV USM, Ø58
28-80mm 3.5-5.6 V USM, Ø58
28-90mm 4-5.6, Ø58
28-90mm 4-5.6 USM, Ø58
28-90mm 4-5.6 II, Ø58
28-90mm 4-5.6 USM II, Ø58
Silver-coloured
35-70mm 3.5-4.5 A, Ø52
Autofocus only - no manual focus ring
35-80mm 4-5.6, Ø52
35-80mm 4-5.6 PZ, Ø52
Powered (motorized) zoom
35-80mm 4-5.6 II, Ø52
35-80mm 4-5.6 III, Ø52
35-80mm 4-5.6 USM, Ø52
35-105mm 4.5-5.6 USM, Ø58
38-76mm 4.5-5.6, Ø52
55-200mm 4.5-5.6 USM, Ø52
55-200mm 4.5-5.6 II USM, Ø52
75-300mm 4-5.6, Ø58
75-300mm 4-5.6, Ø58
75-300mm 4-5.6 II, Ø58
75-300mm 4-5.6 II USM, Ø58
75-300mm 4-5.6 III, Ø58
75-300mm 4-5.6 III USM, Ø58
75-300mm 4-5.6 USM, Ø58
80-200mm 4.5-5.6, Ø52
80-200mm 4.5-5.6 II, Ø52
80-200mm 4.5-5.6 USM, Ø52
90-300mm 4.5-5.6, Ø58
90-300mm 4.5-5.6 USM, Ø58
100-200mm 4.5 A, Ø58
Autofocus only - no manual focus ring
Lens Focal Length Terminology Typical Photography
Less than 21 mm Extreme Wide Angle Architecture
21-35 mm Wide Angle Landscape
35-70 mm Normal Street & Documentary
70-135 mm Medium Telephoto Portraiture
135-300+ mm Telephoto Sports, Birds, Wildlife
------------------------------------------------------------------------------------------------------------------------
Typical Maximum Apertures Relative Light-Gathering Ability Typical Lens Types
f/1.0 32X Fastest Available Prime Lenses
f/1.4 16X Fast Prime Lenses
f/2.0 8X Faster Zoom Lenses
f/2.8 4X Light Weight Zoom Lenses
--------------------------------------------------------------------------------------------------------------------------
Another important factor when selecting lenses is the sensor size.
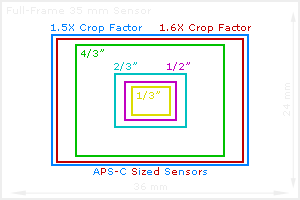
Camera phones and other compact cameras use sensor sizes
-----------------------------------------------------------------------------------------------------------------------
Pixels/Noise
Larger sensors generally also have larger pixels although this is not always the case, which give them the potential to produce lower image noise and have a higher dynamic range. Dynamic range describes the range of tones which a sensor can capture below when a pixel becomes completely white, when texture is indiscernible from background noise near black. Since larger pixels have a greater volume and a greater range of photon capacity these generally have a higher dynamic range.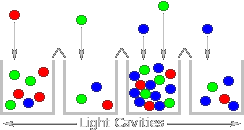
The cavities are shown without color filters present
 Larger Pixels (with a Larger Sensor)
 Smaller Pixels (with a Smaller Sensor)
-----------------------------------------------------------------------------------------------------------------------
Studio Portraits
With the camera set to
Aperture = f/4.5
Shutter Speed = 1/100
ISO = 100

Shutter Speed = 1/100
ISO = 100

---------------------------------------------------------------------
Arthur Fellig (Weegee)

NAME: Weegee
OCCUPATION:Photographer
BIRTH DATE:June 12, 1899
DEATH DATE:December 26, 1968
PLACE OF BIRTH: Zoczew, Poland
He had the ability to be the first photographer on the scene of a major incident, resulted in him being given the nickname, Weegee for which he is best known as today and for a full decade between 1935 and 1946, Weegee was one of the most relentlessly inventive figures in American photography.
One of the greatest photographers to document life in the streets of New York and who often captured life and death at their rawest edges, as for much of his career he was noted for his gritty yet compassionate images of the aftermath of New York street crimes and disasters, which this approach he took set the standard for what has become known as tabloid journalism
Weegee was, in his own words, “spellbound by the mystery of murder.”
He mostly photographed at night and more often then not used infrared film and flash. His images have been said to have the air of a still from a film noir. He particularly paid special attention to the expressions and gestures of his subjects, who for the most part came from the lower strata of New York society.
When Weegee was eleven his family moved to the United States and they settled in New York City, he left school at fourteen to help support his family and his first job was as an assistant to a commercial photographer while he also earned extra money by taking street portraits.
In 1918 Weegee was employed as a darkroom technician by Ducket & Adler in Lower Manhattan and then in 1935 he left his job as a darkroom technician and attempted to make a living as a freelance photographer. Weegee was noted for his subtle juxtapositions challenged daily to capture unique images of newsworthy events and distribute them quickly so he spent his time monitoring police and fire-department radio calls, so he was able to obtain a large number of dramatic photographs and had the ability to photograph crime scenes as soon as they were reported and so his photographs appeared in nearly all of New York's newspapers including New York Tribune, New York Post, World-Telegram, Daily News, Journal-American, PM and the New York Sun, his advantage to this was his ability to establish a way of combining photographs with the text that accompanied them.Weegee later decided to abandoned crime photos and started to concentrate on advertising assignments for Life, Vogue, Holiday.
In 1941 the Photo League put on an exhibition of his work, Weegee: Murder is My Business.

Anthony Esposito accused cop killer, 1941

Police Officer and Assistant remove body of hospital ambulance driver Morris Linker,
East River 1943

"Ruth Snyder Murder" wax display, Eden Musee, Coney Island N.Y 1941
When researching Weegee I soon discovered that his images hide nothing, with a lot of photojournalism images you can only see the image within the frame and you have to try and imagine what was going on surrounding the framed shot, and what had happened, but with Weegee it was they way he shot his images that explained what was going on, he had a great way of positioning himself to enable the viewer to absorb all the scene. I found his images chilling to see these real events that way and to know that non of the images were staged, they were real people and real lives that had been effected within his shots. I would say he was certainly a professional when it come to taking environmental and candid portraits.
"This exhibition affirms that Weegee brought to street photography a new, often shocking vitality. The combination of grit, humanity, intensity, merciless opportunism and spatial precariousness...regularly resulted in pictures that you can’t stop looking at...and don't soon forget."
— The New York Times
These images can be found at
Weegee books,
Naked City (1945)
Weegee People (1946)
Naked Hollywood (1953)
Weegee by Weegee (1961)
---------------------------------------------------------------------------------------------------------------------
Candid Images
Shooting people can be rewarding, frustrating, exhilarating and fun, all at once. Over the last few years, typical portrait and posed photographs of the family have gone way to more of a photo-journalistic style of shooting, and candid photographs of people have emerged as what consumers want. Rather than awkward, posed photos with fake smiles, the value seems to be higher on those candid moments. In order to create spontaneous photographs I have learnt to carry my camera everywhere I go, so I was always ready to capture what life presents to us. The further you are away from your subject the less likely they are to know that you’re photographing them and so you capture them natural and relaxed. Using a telephoto lens or long zoom enables you to shoot from outside their personal space but keep the feeling of intimacy in the shot you’re taking.
Candid photography of people can be put into the following categories:
Photojournalism,
Portraiture,
Creative planning
Unintended Interaction.
If any of these parts go missing, the ability to capture the candid moment disappears and you’re left with what will appear to be a posed photograph, one that looks forced.
This women was totally unaware that I was photographing her and the advantage of that resulted in the image looking natural and expressed her thoughtful side without any fake smiles. The problem I had was the lens as I used a zoom lens and the image appeared out of focus and muddy.
The camera was set to
Aperture = f/5.6
Shutter Speed = 1/125
ISO = 100


Candid Portraits & Environmental Portraits from New York
 f/5.6, 1/100, ISO 100, 18mm
 f/5.6, 1/30, ISO 200,42mm
 f/5.6, 1/30, ISO 200, 55mm


 f/5.6, 1/400, ISO 100, 38mm
1/5
ISO 100
28mm

1/5
ISO 100
28mm

1/80
ISO 100
55mm

1/125
ISO 100
28mm

f5.6
1/125
ISO 1600
25mm

f/5.6
1/30mm
ISO 800
55mm

1/125
ISO 100
55mm

1/125
ISO 100
55mm

1/125
ISO 100
55mm

f5.6, 1/100, ISO 100, 37mm

1/250
ISO 100
55mm

1/13
ISO 800
18mm

1/500
ISO 800
34mm

1/160
ISO 100
35mm

1/160
ISO 100
55mm


1/125
ISO 800
52mm
f/5.6
1/200
ISO 100
55mm

f/5.6, 1/125, ISO 100, 49mm.

f/5.6, 1/640, ISO 100, 55mm
Contact Sheet From New York


These are all the contact cards from the the images I took while in New York I have included all these on my blog as I found it to be a fantastic opportunity for capturing a candid and environmental portraits. I took photo's of people everyday with the intentions of producing some for the people module.
------------------------------------------------------------------------------------------------------------------
Research into Photography Genres
Commercial photography -
As a commercial photographer you are expected
to become part of the marketing mechanism to which manufacturers advertise their products.
It then becomes the photographers responsibility to communicate the products visual merits and
advantages in order to sell the product.The greatest user of commercial photography is the mass media.
Fashion Photography -
As a fashion photographer you are expected to create an overall effect by
communicating the whole lifestyle as a product merit and not just the garment. Fashion photography
tends to be a credible watermark of beauty ideals of a given era, as well as an indicator of the
political and social climate. Baron Adolphe de Meyer is credited as the first fashion photographer.
In 1913, Meyer is said to have took the first fashion photographs for Vogue.
Street Photography -
The photographer is expected to make the portrait look like the person
being photographed. Street photography can be challenging as the use of available light
is the only option with the use of reflectors as a main ally.
Advertising Photography -
Advertising photography during the 1970's an 1980's became
synonymous with expensive high quality imagery and reproductions. The main points were to
communicate information and attract the viewers attention, this being achieved with the
support of a headline and body copy.
Documentary photography -
The main alley of history. Documentary photography is often used to
incite political and social change due to its ability to capture the “true” nature of an image or location. Through these images, the public learns truth information about cultural, political and environmental situations. Documentary photography flourished into the American consciousness during the Great Depression of 1930s when photographers were documenting the pervasive poverty.
Fine Art Photography -
Fine Art Photography, also known as art photography, which refers to the
branch of photography dedicated to producing images for purely aesthetic purposes.
Fine art photography is mainly housed in museums and galleries, and is focused on presenting
beautiful objects or ordinary objects in beautiful ways to convey intensity and emotion.
Much of art photography is produced in limited quantities and at times it is used in advertisements or magazines.
--------------------------------------------------------------------------------------------------------------------------
Camera Settings -
Contrast - Contrast can be subdivided into subject contrast, lighting contrast,
lighting ratio's and brightness range. Contrast emphasises texture within an image.
Out of focus images the contrast pixels are low and when the image is in focus the contrast
pixels are greater. An high contrast image means the ratio between the lightest and darkest elements
exceeds 32:1. Low contrast images ratio between the lightest and darkest elements is less than 2:1
These result in the use of stops - One stop = 2:1, two stops = 4:1, three stops 8:1, four stops = 16:1
So the overall image contrast is therefore determined by a combination of subject and lighting.
Shutter Speed -
Fast shutter speeds with high iso and low f-number results in the image having a lot
of image noise and a small depth of field. Slower shutter speed with low iso and high f number
results in the image having little sharpness and would require the use of a tripod as holding the
camera still for so long would be difficult. By applying the shutter speed to 1/2 a waterfall would
look very misty and smokey, applying shutter speed 1/10 would result in the water having a mist on it, by applying 1/30 the water would look to have a slight mist above it, and by applying 1/400 the
result would be that the water looked normal and in normal flow. By applying slow shutter speeds enables the camera to capture motion.
F-stops -
The distance between the darkest and lightest tones can be measured in f-stops, so if the
distance between a white shirt and black jeans is 3 stops then 8 times more light is being reflected by
the shirt than the jeans. Setting the f-stop can make a difference to the light that's entering the camera
at the time of exposure, so if the camera is set to a low f-stop then a lot of light will be entering the camera as the opening is big. A high f-stop number will make the image darker as the opening is smaller and therefore there is less light able to enter the camera which results in the bokeh effect with less of the image in focus.
-------------------------------------------------------------------------------------------------------------------------
Viewing photography -
Western visual culture has determined the way we look at photographs and as humans our eyes naturally scan an image from top left to bottom right, therefore balance within an image is essential and by moving the camera close to the subject it fills the frame and becomes the dominant part of the composition. Therefore we do tend to gravitate more towards a balanced image. When there is symmetry between the elements within the frame the image is said to have a sense of balance. Although balanced images can also sometimes appear bland and conservative, a dominant element of balance is visually created by the distribution of light and dark tones. Lines within an image have the ability to lead the viewers eyes around the image, horizontal lines give the viewer the sense of stability balance, vertical lines create a sense of dominance, strength and power, when aligned to the edges they give a great static composition, tilted vertical lines forms an unbalanced image which creates visual tension within the image. Diagonal lines create visual tension which leads to dynamic composition and a sense of movement. Curves within an image can be soothing on the eyes as they tend to create an unobstructive and orderly manner within an image. Depth within an image can be created by placing an item in front or behind the subject, it can also be created with the careful use of lines, tonality, contrast, color, d.o.f, and framing. Shadows can also give depth to an image determine by the direction of the light they create texture, shape, form and perspective and without shadows images appear flat and visually dull. Composition is what attracts the viewers attention to the subject, the subject receives prominence without the distraction of other elements within the frame as the composition complements the communication within the image. Placing the subject centrally within the image should usually be avoided and the use of the whole frame encouraged. Rule of thirds is another contribution of composition, by using the rule of thirds it also helps keeps the image looking 2D and not flat. The rule of thirds is created by dividing the frame into three equal parts both vertically and horizontally and by placing the subject within one and a half of the lines.
--------------------------------------------------------------------------------------------------------------------------
Walker Evans

Died - April 10, 1975 (aged 71)New Haven, Connecticut, U.S.A.
Influenced by Eugène Atget, August Sander
Influenced Robert Frank
American photographer, Evans began his photographic career in 1928 although he became interested in photography as a child, when he collected penny postcards and took pictures of his friends and family with an inexpensive Kodak camera. His studies of Victorian architecture and his photographs of the rural South during the Great Depression made him one of the best photographer in his era. In 1935 Evans joined the Farm Security Administration to document the lives of the rural poor at the height of the Depression and these images, are among his best-known works (shown below) and he continued to work for the FSA till 1938. His work is characterised by a spare precision that emphasises the dignity of his subjects, he had a way of capturing the people in their times of trouble and he was able to portray this in their facial expression. Much of Evans' work from the FSA period uses the large-format, 8x10-inch camera. He said that his goal as a photographer was to make pictures that are "literate, authoritative, transcendent". Many of his works are in the permanent collections of museums, and have been the subject of retrospectives at such institutions as The Metropolitan Museum of Art."

Summer of 1936. William Edward "Bud" Fields, wife Lily Rogers Fields and infant daughter Lilian at their sharecropper cabin in Hale County, Alabama. Photograph by Walker Evans for the Farm Security Administration.

One of Walkers most famous photographs, by Walker Evans (1903-1975),
Is of an icon of yhe Depression-era misery. Evans took the photo in the summer of 1936 while working for the Federal Farm Security Administration. He and writer James Agee had been sent by Fortune magazine on an assignment to Hale County, Alabama for a story. While there, Evans and Agee stayed with three white sharecropper families headed by Bud Fields, Floyd Burroughs and, Frank Tingle. The magazine opted not to run their story and years later the two published a groundbreaking book entitled 'Let Us Now Praise Famous Men' that painted a deeply moving portrait of rural poverty. This portrait of Allie Mae Burroughs, the wife of Floyd Burroughs, was included.
Her expression tells the story of desperate poverty, destitution, and despair in the midst of the Great Depression.
Initially hoping to become a writer, Evans went to Paris in 1926 to study literature. After returning to the United States, he began to establish himself as a photographer with images of architecture and everyday life. In 1933, writer Lincoln Kirstein described Evans’s work as possessing a ‘tender cruelty’, referring to his combination of a clear, factual gaze with empathy for his subject matter. .
A retrospective of Evans’s work was the first major photography exhibition at the Museum of Modern Art, New York. The accompanying publication American Photographs 1938 was carefully selected and ordered by Evans, one of the first examples of a photography book being presented as an important art form in its own right. Evans’s other notable works included portraits of passengers on the New York subway, taken using a concealed camera.
During the twentieth century Evans achieved international recognition as a fine art photographer, and his work has been firmly positioned in the canon of fine art photography since then.

Washstand in the dog run and kitchen of Floyd Burroughs' cabin. Hale County, Alabama (LOC)
[1935 or 1936] 1 negative ; 8 x 10 inches or smaller.
In one of his last photographic projects, Evans completed a black and white portfolio of Brown Brothers Harriman's offices and partners for publication in "Partners in Banking," published in 1968 to celebrate the private bank's 150th anniversary.

489 Views and Studies of Brown Brothers Harriman & Company Bankers,
Walker Evans (American, St. Louis, Missouri 1903–1975 New Haven, Connecticut)
Date: 1966–67
After researching Walker Evan I found myself thinking about his work while in New York and this helped when capturing both candid and environmental portraits, I tried to capture people who were deep in thought and who's facial expressions told a million stories.

Walker Evans, Brooklyn Bridge, c. 1929

My Brooklyn Bridge image that resembles Walkers.
Books by Evans
Let Us Now Praise Famous Men (1941, with text by James Agee).
American Photographs (1938)
Message from the Interior (1966).
Photographer of America (Neal Porter books 2007)
Fine Art


Born 11 June 1815 Calcutta, British India
Died 26 January 1879 (aged 63)
Nationality British

The work of the pioneering Victorian photographer Julia Margaret Cameron (1815-1879) with its celebrated soft-focus and atmospheric lighting remains, exceptionally powerful and evocative. She is rightly recognised as one of the most influential figures from the early days of portrait photography, and her work has been compared to that of the painters and artists of the Pre-Raphaelite movement - among whom she was numbered as a friend and colleague.
When I decided to produce my fine art images I was highly inspired by Julia Margaret Cameron her images have a certain amount of elligance to them and they really stood out to me when I was researching for this part of the brief. She had a certain aire to her images. Cameron was educated in France, but returned to India, and in 1838. In 1863 her daughter gave her a camera and her photographic career took off from there, she soon became a member of the Photographic Societies of London and Scotland. She photographed the intellectuals and leaders within her circle of family and friends, among them the portrait painter George Frederick Watts, the astronomer Sir John Herschel, and the Poet Laureate Alfred, Lord Tennyson. She had the ability to capture beauty with the use of soft focus images

Ellen Terry photographed in 1864 by Julia Margaret Cameron
When she made photographs that concerned beauty, King Arthur, myth, the poetry of Tennyson, and the painting of Raphael, as she understood it. For models she used her friends and maids and their friends and children, and converted them by act of will into Biblical heroines, Renaissance cherubs, and Arthurian maidens. She was visionary in her belief of the 'divine' power of the medium, daring in her experiments with image making and persistent in the promotion of her work. Her images were madeof albumen-silver prints from wet collodion glass plate negatives, she was innovative and unconventional in her approach to the technical applications of her medium in order to create images transcending a purely descriptive function of photography

Freddy Gould, 1866, Albumen print from wet collodion-on-glass negative, Museum no. Ph 1139-1933.
Her photography career spanned over 11 year and she produced many fantastic images during this time. Cameron’s pictured were known for a fuzzy, slightly out of focus look for which some of the artists of her day ridiculed her. She searched for a more artistic approach to the portrait and felt she achieved it in this manner. She referred to it as differential focus, which she felt gave a modeled effect. Cameron was a religious woman and she felt that she could help revive religious art through her photography. One of Cameron’s photos, “The Return: After Three Days” combines several episodes in the life of Christ. The main focus of the pictures are of a young Christ. Flowers that are present in the photo are out of focus, suggesting rather than representing his passion.
----------------------------------------------------------------------------------------------------------------------